

Lo que pongo aquí es solo un experimento. Como dije en mi anterior post, me encanta Blender para hacer montajes de vídeo y para mí, es el mejor editor de vídeo disponible para GNU/Linux. Aunque tiene un pequeño defecto, bueno, muy grande… apenas tiene efectos para los vídeos, por lo que si quieres algún efecto que no sea un crossfade, una corrección de color, o un blur, vas a tener que hacerlo de otra forma y eso implica exportar vídeo y luego importarlo cuando esté hecho. Con el gran inconveniente de que si el efecto no ha quedado exactamente como quieres, si de verdad te quedan ganas para modificarlo tienes que repetir el proceso.
Me gustan los efectos, y quiero hacer pruebas, porque no había mirado mucho el código fuente de Blender, me parece una bestia, tiene muchas cosas, y partes que se han quedado un poco viejas, como es el VSE (Video Sequence Editor), el módulo de Blender que más utilizo. Así que, ¿por qué no empezar a crear algunos efectos?
Tabla de contenidos
Construyendo Blender
Lo malo de todo esto, es que al contrario que con programas privativos, Blender no soporta plugins para efectos. Lo hizo en el pasado, pero por razones que no llego a comprender (supongo que relacionadas con el mantenimiento, con que nadie quiso hacerse cargo del módulo y con que tal vez les reportaban muchos fallos sobre efectos cuando el fallo no estaba en Blender, sino en el que realizaba el propio efecto). Lo malo, es que si queremos incluir un nuevo efecto en Blender, debemos recompilar nuestra versión de Blender. No tarda mucho, pero tiene algunas dependencias algo pesadas. Una vez que lo has hecho, las siguientes compilaciones no tardarán mucho, ya que sólo compila el código nuevo (lo que hacemos nosotros).
Bueno, he dicho que Blender no tiene API… ¡claro que tiene! Lo malo es que es una API en Python, y personalmente (que lo he probado), efectos que renderizan a 25fps hechos en C, van a 0.3fps hechos en Python. Es cierto que no he utilizado ninguna de las fantásticas bibliotecas de imagen digital disponibles para Python, pero de todas formas hay que hacer que el vídeo se exporte a Python, y sólo lo he conseguido hacer con alguna guarrada que me da vergüenza mencionar aquí…
Lo primero es decargarte el código fuente de la página principal o del git oficial de Blender (git://git.blender.org/blender.git). Si vas a compartir lo que haces con la comunidad, te recomiendo utilizar git para poder enviar parches y demás.
El caso es que si queremos compilar Blender, necesitamos un entorno de compilación GCC, y las siguientes bibliotecas con sus cabeceras para programación: python, numpy, libx11, libjpeg, libpng, boost, ffmpeg, libopencolorio, libilm, libopenexr y algunas más. Las encuentras todas en blender/build_files/build_environment/install_deps.sh
Antes de meterme con código
Si echas un vistazo por encima al código parece muchísimo, ¡ pero no es tanto ! Como es un programa tan grande, en muchos archivos, para que sepamos qué tenemos que tocar. Como no puedo decir la línea exacta ya que este programa se modifica a menudo he decidido poner unas cuantas líneas, o funciones completas a modo de referencia. Cuando lo que nos afecta es lo referente a CUSTOM_EFFECT.
¡Empezamos con la aventura!
Botón en la interfaz
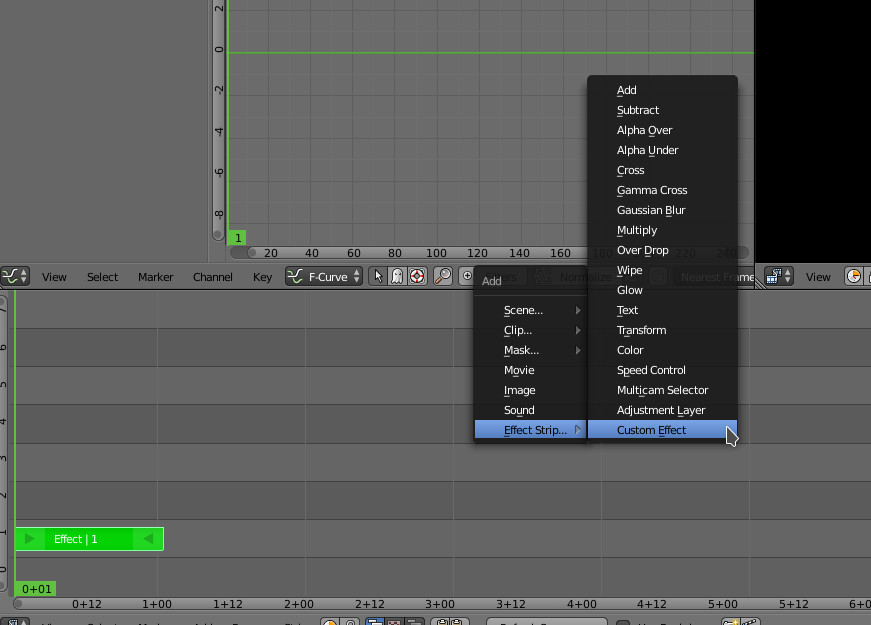
Lo primero, es que desde la interfaz podamos añadir un nuevo efecto. Que cuando estemos en el secuenciador, pulsando Shift+A -> Effect aparezca nuestro efecto en el menú, para eso, tenemos que editar
Para eso, editamos el archivo source/blender/makesdna/DNA_sequence_types.h y añadimos una nueva constante con nuestro effecto. Mi efecto se llamará CUSTOMEFFECT, además, incrementamos SEQ_TYPE_MAX. En mi caso, la cosa queda más o menos así (cerca de la línea 500, en la versión 2.78c):
1 2 3 4 5 6 7 8 9 10 11 12 13 14 15 16 17 18 19 20 21 22 23 24 25 26 27 28 29 30 31 32 33 | enum { SEQ_TYPE_IMAGE = 0, SEQ_TYPE_META = 1, SEQ_TYPE_SCENE = 2, SEQ_TYPE_MOVIE = 3, SEQ_TYPE_SOUND_RAM = 4, SEQ_TYPE_SOUND_HD = 5, SEQ_TYPE_MOVIECLIP = 6, SEQ_TYPE_MASK = 7, SEQ_TYPE_EFFECT = 8, SEQ_TYPE_CROSS = 8, SEQ_TYPE_ADD = 9, SEQ_TYPE_SUB = 10, SEQ_TYPE_ALPHAOVER = 11, SEQ_TYPE_ALPHAUNDER = 12, SEQ_TYPE_GAMCROSS = 13, SEQ_TYPE_MUL = 14, SEQ_TYPE_OVERDROP = 15, /* SEQ_TYPE_PLUGIN = 24, */ /* Deprecated */ SEQ_TYPE_WIPE = 25, SEQ_TYPE_GLOW = 26, SEQ_TYPE_TRANSFORM = 27, SEQ_TYPE_COLOR = 28, SEQ_TYPE_SPEED = 29, SEQ_TYPE_MULTICAM = 30, SEQ_TYPE_ADJUSTMENT = 31, SEQ_TYPE_GAUSSIAN_BLUR = 40, SEQ_TYPE_TEXT = 41, SEQ_TYPE_CUSTOMEFFECT = 42, SEQ_TYPE_MAX = 42 }; |
Nuestro efecto, tendrá el índice 42, aunque no nos importa mucho la posición que ocupe. Ahora vamos al archivo source/blender/editors/space_sequencer/sequencer_edit.c, metemos el mismo efecto:
1 2 3 4 5 6 7 8 9 10 11 12 13 14 15 16 17 18 19 20 21 | EnumPropertyItem sequencer_prop_effect_types[] = { {SEQ_TYPE_CROSS, "CROSS", 0, "Crossfade", "Crossfade effect strip type"}, {SEQ_TYPE_ADD, "ADD", 0, "Add", "Add effect strip type"}, {SEQ_TYPE_SUB, "SUBTRACT", 0, "Subtract", "Subtract effect strip type"}, {SEQ_TYPE_ALPHAOVER, "ALPHA_OVER", 0, "Alpha Over", "Alpha Over effect strip type"}, {SEQ_TYPE_ALPHAUNDER, "ALPHA_UNDER", 0, "Alpha Under", "Alpha Under effect strip type"}, {SEQ_TYPE_GAMCROSS, "GAMMA_CROSS", 0, "Gamma Cross", "Gamma Cross effect strip type"}, {SEQ_TYPE_MUL, "MULTIPLY", 0, "Multiply", "Multiply effect strip type"}, {SEQ_TYPE_OVERDROP, "OVER_DROP", 0, "Alpha Over Drop", "Alpha Over Drop effect strip type"}, {SEQ_TYPE_WIPE, "WIPE", 0, "Wipe", "Wipe effect strip type"}, {SEQ_TYPE_GLOW, "GLOW", 0, "Glow", "Glow effect strip type"}, {SEQ_TYPE_TRANSFORM, "TRANSFORM", 0, "Transform", "Transform effect strip type"}, {SEQ_TYPE_COLOR, "COLOR", 0, "Color", "Color effect strip type"}, {SEQ_TYPE_SPEED, "SPEED", 0, "Speed", "Color effect strip type"}, {SEQ_TYPE_MULTICAM, "MULTICAM", 0, "Multicam Selector", ""}, {SEQ_TYPE_ADJUSTMENT, "ADJUSTMENT", 0, "Adjustment Layer", ""}, {SEQ_TYPE_GAUSSIAN_BLUR, "GAUSSIAN_BLUR", 0, "Gaussian Blur", ""}, {SEQ_TYPE_TEXT, "TEXT", 0, "Text", ""}, {SEQ_TYPE_CUSTOMEFFECT, "CUSTOMEFFECT", 0, "Custom Effect", "Create a strip with customized effect" }, {0, NULL, 0, NULL, NULL} }; |
Dentro de cada elemento del array tendremos:
- Índice, para lo que cogemos un valor de nuestro enum de antes. Será de uso interno,
- String clave, será una cadena en clave, que manejaremos desde Python para referirnos al efecto.
- El 0 siguiente indica que no hay icono asociado, por ahora no tenemos iconos
- Luego el nombre del efecto, para mostrarlo
- Por último, la descripción del efecto
Ahora en el archivo source/blender/makesrna/intern/rna_sequencer_api.c:
1 2 3 4 5 6 7 8 9 10 11 12 13 14 15 16 17 18 19 20 21 22 23 24 25 26 27 | void RNA_api_sequences(BlenderRNA *brna, PropertyRNA *cprop) { StructRNA *srna; PropertyRNA *parm; FunctionRNA *func; static EnumPropertyItem seq_effect_items[] = { {SEQ_TYPE_CROSS, "CROSS", 0, "Cross", ""}, {SEQ_TYPE_ADD, "ADD", 0, "Add", ""}, {SEQ_TYPE_SUB, "SUBTRACT", 0, "Subtract", ""}, {SEQ_TYPE_ALPHAOVER, "ALPHA_OVER", 0, "Alpha Over", ""}, {SEQ_TYPE_ALPHAUNDER, "ALPHA_UNDER", 0, "Alpha Under", ""}, {SEQ_TYPE_GAMCROSS, "GAMMA_CROSS", 0, "Gamma Cross", ""}, {SEQ_TYPE_MUL, "MULTIPLY", 0, "Multiply", ""}, {SEQ_TYPE_OVERDROP, "OVER_DROP", 0, "Over Drop", ""}, {SEQ_TYPE_WIPE, "WIPE", 0, "Wipe", ""}, {SEQ_TYPE_GLOW, "GLOW", 0, "Glow", ""}, {SEQ_TYPE_TRANSFORM, "TRANSFORM", 0, "Transform", ""}, {SEQ_TYPE_COLOR, "COLOR", 0, "Color", ""}, {SEQ_TYPE_SPEED, "SPEED", 0, "Speed", ""}, {SEQ_TYPE_MULTICAM, "MULTICAM", 0, "Multicam Selector", ""}, {SEQ_TYPE_ADJUSTMENT, "ADJUSTMENT", 0, "Adjustment Layer", ""}, {SEQ_TYPE_GAUSSIAN_BLUR, "GAUSSIAN_BLUR", 0, "Gaussian Blur", ""}, {SEQ_TYPE_TEXT, "TEXT", 0, "Text", ""}, {SEQ_TYPE_CUSTOMEFFECT, "CUSTOM_EFFECT", 0, "Custom Effect", "" }, {0, NULL, 0, NULL, NULL} }; |
Seguimos con la interfaz de Python. Para que el elemento aparezca en el menú debemos incluir lo siguiente en el archivo release/scripts/startup/bl_ui/space_sequencer.py (añadir la última línea, más o menos alrededor de la línea 380, blender 2.78c):
1 2 3 4 5 6 7 8 9 10 11 12 13 14 15 16 17 18 19 20 21 22 23 24 25 26 | class SEQUENCER_MT_add_effect(Menu): bl_label = "Effect Strip..." def draw(self, context): layout = self.layout layout.operator_context = 'INVOKE_REGION_WIN' layout.operator("sequencer.effect_strip_add", text="Add").type = 'ADD' layout.operator("sequencer.effect_strip_add", text="Subtract").type = 'SUBTRACT' layout.operator("sequencer.effect_strip_add", text="Alpha Over").type = 'ALPHA_OVER' layout.operator("sequencer.effect_strip_add", text="Alpha Under").type = 'ALPHA_UNDER' layout.operator("sequencer.effect_strip_add", text="Cross").type = 'CROSS' layout.operator("sequencer.effect_strip_add", text="Gamma Cross").type = 'GAMMA_CROSS' layout.operator("sequencer.effect_strip_add", text="Gaussian Blur").type = 'GAUSSIAN_BLUR' layout.operator("sequencer.effect_strip_add", text="Multiply").type = 'MULTIPLY' layout.operator("sequencer.effect_strip_add", text="Over Drop").type = 'OVER_DROP' layout.operator("sequencer.effect_strip_add", text="Wipe").type = 'WIPE' layout.operator("sequencer.effect_strip_add", text="Glow").type = 'GLOW' layout.operator("sequencer.effect_strip_add", text="Text").type = 'TEXT' layout.operator("sequencer.effect_strip_add", text="Transform").type = 'TRANSFORM' layout.operator("sequencer.effect_strip_add", text="Color").type = 'COLOR' layout.operator("sequencer.effect_strip_add", text="Speed Control").type = 'SPEED' layout.operator("sequencer.effect_strip_add", text="Multicam Selector").type = 'MULTICAM' layout.operator("sequencer.effect_strip_add", text="Adjustment Layer").type = 'ADJUSTMENT' layout.operator("sequencer.effect_strip_add", text="Custom Effect").type = 'CUSTOM_EFFECT' |
Ahora definimos el color del elemento una vez lo pongamos en la línea de tiempo. Para ello en source/blender/editors/space_sequencer/sequencer_draw.c vamos a la función color3ubv_from_seq() donde, dentro del case, dejamos algo como esto (es aproximado, podemos definirle el color si queremos, pero yo me he basado en el color de otros elementos parecidos):
1 2 3 4 5 6 7 8 9 10 11 12 13 14 15 16 17 18 19 20 21 22 23 24 25 26 27 28 29 30 | /* effects */ case SEQ_TYPE_TRANSFORM: case SEQ_TYPE_SPEED: case SEQ_TYPE_ADD: case SEQ_TYPE_SUB: case SEQ_TYPE_MUL: case SEQ_TYPE_ALPHAOVER: case SEQ_TYPE_ALPHAUNDER: case SEQ_TYPE_OVERDROP: case SEQ_TYPE_GLOW: case SEQ_TYPE_MULTICAM: case SEQ_TYPE_ADJUSTMENT: case SEQ_TYPE_GAUSSIAN_BLUR: case SEQ_TYPE_CUSTOMEFFECT: UI_GetThemeColor3ubv(TH_SEQ_EFFECT, col); /* slightly offset hue to distinguish different effects */ if (seq->type == SEQ_TYPE_ADD) rgb_byte_set_hue_float_offset(col, 0.04); else if (seq->type == SEQ_TYPE_SUB) rgb_byte_set_hue_float_offset(col, 0.08); else if (seq->type == SEQ_TYPE_MUL) rgb_byte_set_hue_float_offset(col, 0.12); else if (seq->type == SEQ_TYPE_ALPHAOVER) rgb_byte_set_hue_float_offset(col, 0.16); else if (seq->type == SEQ_TYPE_ALPHAUNDER) rgb_byte_set_hue_float_offset(col, 0.20); else if (seq->type == SEQ_TYPE_OVERDROP) rgb_byte_set_hue_float_offset(col, 0.24); else if (seq->type == SEQ_TYPE_GLOW) rgb_byte_set_hue_float_offset(col, 0.28); else if (seq->type == SEQ_TYPE_TRANSFORM) rgb_byte_set_hue_float_offset(col, 0.36); else if (seq->type == SEQ_TYPE_MULTICAM) rgb_byte_set_hue_float_offset(col, 0.32); else if (seq->type == SEQ_TYPE_ADJUSTMENT) rgb_byte_set_hue_float_offset(col, 0.40); else if (seq->type == SEQ_TYPE_GAUSSIAN_BLUR) rgb_byte_set_hue_float_offset(col, 0.42); else if (seq->type == SEQ_TYPE_CUSTOMEFFECT) rgb_byte_set_hue_float_offset(col, 0.52); break; |
Si compilamos y ejecutamos Blender, seguramente nuestro efecto aparezca y lo podremos añadir, pero no hará nada, sólo soltar errores por la consola.
Definiendo algunas propiedades
Debemos definir antes de continuar algunas propiedades básicas del strip. En source/blender/makesrna/intern/rna_sequencer.c haremos varias modificaciones. Primero, en la función rna_def_sequence() (alrededor de la línea 1380), volvemos a meter nuestro efecto:
1 2 3 4 5 6 7 8 9 10 11 12 13 14 15 16 17 18 19 20 21 22 23 24 25 26 27 28 29 30 31 32 33 | static void rna_def_sequence(BlenderRNA *brna) { StructRNA *srna; PropertyRNA *prop; static const EnumPropertyItem seq_type_items[] = { {SEQ_TYPE_IMAGE, "IMAGE", 0, "Image", ""}, {SEQ_TYPE_META, "META", 0, "Meta", ""}, {SEQ_TYPE_SCENE, "SCENE", 0, "Scene", ""}, {SEQ_TYPE_MOVIE, "MOVIE", 0, "Movie", ""}, {SEQ_TYPE_MOVIECLIP, "MOVIECLIP", 0, "Clip", ""}, {SEQ_TYPE_MASK, "MASK", 0, "Mask", ""}, {SEQ_TYPE_SOUND_RAM, "SOUND", 0, "Sound", ""}, {SEQ_TYPE_CROSS, "CROSS", 0, "Cross", ""}, {SEQ_TYPE_ADD, "ADD", 0, "Add", ""}, {SEQ_TYPE_SUB, "SUBTRACT", 0, "Subtract", ""}, {SEQ_TYPE_ALPHAOVER, "ALPHA_OVER", 0, "Alpha Over", ""}, {SEQ_TYPE_ALPHAUNDER, "ALPHA_UNDER", 0, "Alpha Under", ""}, {SEQ_TYPE_GAMCROSS, "GAMMA_CROSS", 0, "Gamma Cross", ""}, {SEQ_TYPE_MUL, "MULTIPLY", 0, "Multiply", ""}, {SEQ_TYPE_OVERDROP, "OVER_DROP", 0, "Over Drop", ""}, {SEQ_TYPE_WIPE, "WIPE", 0, "Wipe", ""}, {SEQ_TYPE_GLOW, "GLOW", 0, "Glow", ""}, {SEQ_TYPE_TRANSFORM, "TRANSFORM", 0, "Transform", ""}, {SEQ_TYPE_COLOR, "COLOR", 0, "Color", ""}, {SEQ_TYPE_SPEED, "SPEED", 0, "Speed", ""}, {SEQ_TYPE_MULTICAM, "MULTICAM", 0, "Multicam Selector", ""}, {SEQ_TYPE_ADJUSTMENT, "ADJUSTMENT", 0, "Adjustment Layer", ""}, {SEQ_TYPE_GAUSSIAN_BLUR, "GAUSSIAN_BLUR", 0, "Gaussian Blur", ""}, {SEQ_TYPE_TEXT, "TEXT", 0, "Text", ""}, {SEQ_TYPE_CUSTOMEFFECT, "CUSTOM_EFFECT", 0, "Custom Effect", "" }, {0, NULL, 0, NULL, NULL} }; |
Luego en la línea 2390 más o menos modificamos la estructura def_effects añadiendo la definición de nuestro nuevo efecto:
1 2 3 4 5 6 7 8 9 10 11 12 13 14 15 16 17 18 19 20 21 22 23 24 25 26 27 28 29 30 | static EffectInfo def_effects[] = { {"AddSequence", "Add Sequence", "Add Sequence", NULL, 2}, {"AdjustmentSequence", "Adjustment Layer Sequence", "Sequence strip to perform filter adjustments to layers below", rna_def_input, 0}, {"AlphaOverSequence", "Alpha Over Sequence", "Alpha Over Sequence", NULL, 2}, {"AlphaUnderSequence", "Alpha Under Sequence", "Alpha Under Sequence", NULL, 2}, {"ColorSequence", "Color Sequence", "Sequence strip creating an image filled with a single color", rna_def_solid_color, 0}, {"CrossSequence", "Cross Sequence", "Cross Sequence", NULL, 2}, {"GammaCrossSequence", "Gamma Cross Sequence", "Gamma Cross Sequence", NULL, 2}, {"GlowSequence", "Glow Sequence", "Sequence strip creating a glow effect", rna_def_glow, 1}, {"MulticamSequence", "Multicam Select Sequence", "Sequence strip to perform multicam editing", rna_def_multicam, 0}, {"MultiplySequence", "Multiply Sequence", "Multiply Sequence", NULL, 2}, {"OverDropSequence", "Over Drop Sequence", "Over Drop Sequence", NULL, 2}, {"SpeedControlSequence", "SpeedControl Sequence", "Sequence strip to control the speed of other strips", rna_def_speed_control, 1}, {"SubtractSequence", "Subtract Sequence", "Subtract Sequence", NULL, 2}, {"TransformSequence", "Transform Sequence", "Sequence strip applying affine transformations to other strips", rna_def_transform, 1}, {"WipeSequence", "Wipe Sequence", "Sequence strip creating a wipe transition", rna_def_wipe, 2}, {"GaussianBlurSequence", "Gaussian Blur Sequence", "Sequence strip creating a gaussian blur", rna_def_gaussian_blur, 1}, {"TextSequence", "Text Sequence", "Sequence strip creating text", rna_def_text, 0}, {"CustomEffectSequence", "Custom Effect Sequence", "Sequence strip creating custom effects", rna_def_custom_effect, 1}, {"", "", "", NULL, 0} }; |
Donde, el 1 que acompaña la declaración del efecto es el número de entradas que necesitamos. Al aplicarse sobre otro strip, necesitamos un 1 aquí. Si fuera un generador, sería 0 y una transición tendría 2.
Ahora, junto con los demás efectos (línea 2100 más o menos), creamos la función rna_def_customeffect donde definiremos los parámetros que se podrán tocar de nuestro efecto, que luego tendremos que vincular con Python, que no se nos olvide:
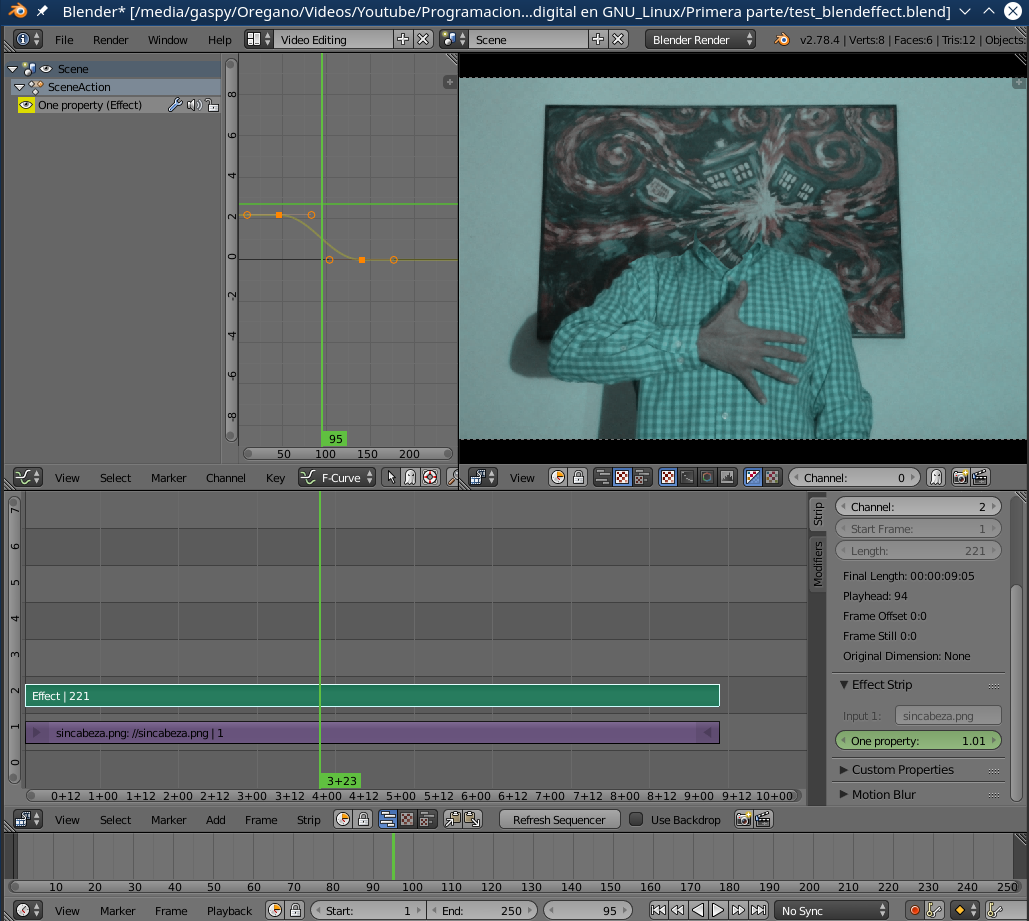
1 2 3 4 5 6 7 8 9 10 | static void rna_def_custom_effect(StructRNA *srna) { PropertyRNA *prop; RNA_def_struct_sdna_from(srna, "CustomEffectVars", "effectdata"); prop = RNA_def_property(srna, "property", PROP_FLOAT, PROP_UNSIGNED); RNA_def_property_ui_text(prop, "One property", "One float prop for practising"); RNA_def_property_ui_range(prop, 0.0f, FLT_MAX, 1, -1); RNA_def_property_update(prop, NC_SCENE | ND_SEQUENCER, "rna_Sequence_update"); } |
Y añadimos nuestro efecto a la función rna_sequence_refine():
1 2 3 4 5 6 7 8 9 10 11 12 13 14 15 16 17 18 19 20 21 22 23 24 25 26 27 28 29 30 31 32 33 34 35 36 37 38 39 40 41 42 43 44 45 46 47 48 49 50 51 52 53 54 55 56 57 58 59 | static StructRNA *rna_Sequence_refine(struct PointerRNA *ptr) { Sequence *seq = (Sequence *)ptr->data; switch (seq->type) { case SEQ_TYPE_IMAGE: return &RNA_ImageSequence; case SEQ_TYPE_META: return &RNA_MetaSequence; case SEQ_TYPE_SCENE: return &RNA_SceneSequence; case SEQ_TYPE_MOVIE: return &RNA_MovieSequence; case SEQ_TYPE_MOVIECLIP: return &RNA_MovieClipSequence; case SEQ_TYPE_MASK: return &RNA_MaskSequence; case SEQ_TYPE_SOUND_RAM: return &RNA_SoundSequence; case SEQ_TYPE_CROSS: return &RNA_CrossSequence; case SEQ_TYPE_ADD: return &RNA_AddSequence; case SEQ_TYPE_SUB: return &RNA_SubtractSequence; case SEQ_TYPE_ALPHAOVER: return &RNA_AlphaOverSequence; case SEQ_TYPE_ALPHAUNDER: return &RNA_AlphaUnderSequence; case SEQ_TYPE_GAMCROSS: return &RNA_GammaCrossSequence; case SEQ_TYPE_MUL: return &RNA_MultiplySequence; case SEQ_TYPE_OVERDROP: return &RNA_OverDropSequence; case SEQ_TYPE_MULTICAM: return &RNA_MulticamSequence; case SEQ_TYPE_ADJUSTMENT: return &RNA_AdjustmentSequence; case SEQ_TYPE_WIPE: return &RNA_WipeSequence; case SEQ_TYPE_GLOW: return &RNA_GlowSequence; case SEQ_TYPE_TRANSFORM: return &RNA_TransformSequence; case SEQ_TYPE_COLOR: return &RNA_ColorSequence; case SEQ_TYPE_SPEED: return &RNA_SpeedControlSequence; case SEQ_TYPE_GAUSSIAN_BLUR: return &RNA_GaussianBlurSequence; case SEQ_TYPE_TEXT: return &RNA_TextSequence; case SEQ_TYPE_CUSTOM_EFFECT: return &RNA_CustomEffectSequence; default: return &RNA_Sequence; } } |
Por último en source/blender/makesrna/RNA_access.h metemos esta línea, más o menos en la 280:
1 | extern StructRNA RNA_CustomEffectSequence; |
Insertamos las propiedades de nuestro efecto
Por ahora sólo estoy metiendo una, y no hace nada, sólo estar ahí, pero me sirve como plantilla para futuros efectos. Antes de que se nos olvide, vamos a añadirla desde la interfaz de Python. En el archivo en el archivo release/scripts/startup/bl_ui/space_sequencer.py en la clase CLASS_PT_EFFECT(), al final del todo añadimos nuestro efecto:
1 2 3 4 5 6 7 8 9 10 11 12 | col = layout.column(align=True) if strip.type == 'SPEED': col.prop(strip, "multiply_speed") elif strip.type in {'CROSS', 'GAMMA_CROSS', 'WIPE', 'ALPHA_OVER', 'ALPHA_UNDER', 'OVER_DROP'}: col.prop(strip, "use_default_fade", "Default fade") if not strip.use_default_fade: col.prop(strip, "effect_fader", text="Effect fader") elif strip.type == 'GAUSSIAN_BLUR': col.prop(strip, "size_x") col.prop(strip, "size_y") elif strip.type == 'CUSTOM_EFFECT': col.prop(strip, 'property') |
Ahora declaramos las propiedades de nuestro efecto. Para ello en el archivo source/blender/makesdna/DNA_sequence_types.h insertamos lo sigueinte (cerca de la 290, junto con los demás efectos, ya los veréis):
1 2 3 | typedef struct CustomEffectVars { float property; } CustomEffectVars; |
Mi propiedad se llamaba property, porque soy muy original, pero aquí pondremos las que necesitemos. Podremos poner arrays de char para cadenas de caracteres, char, short para flags, enteros y float, por ejemplo, los colores van en float. Podríamos poner otros tipos de variable, pero no he probado… no soy tan valiente.
Para que las propiedades de nuestro efecto se guarden cuando salvamos el archivo .blend hacemos, editamos source/blender/blenloader/intern/writefile.c añadiendo la estructura de nuestro efecto, alrededor de la límea 2660:
1 2 3 4 5 6 7 8 9 10 11 12 13 14 15 16 17 18 19 20 21 22 23 24 25 26 27 28 29 30 31 32 33 34 35 | SEQ_BEGIN(ed, seq) { if (seq->strip && seq->strip->done == 0) { /* write strip with 'done' at 0 because readfile */ if (seq->effectdata) { switch (seq->type) { case SEQ_TYPE_COLOR: writestruct(wd, DATA, SolidColorVars, 1, seq->effectdata); break; case SEQ_TYPE_SPEED: writestruct(wd, DATA, SpeedControlVars, 1, seq->effectdata); break; case SEQ_TYPE_WIPE: writestruct(wd, DATA, WipeVars, 1, seq->effectdata); break; case SEQ_TYPE_GLOW: writestruct(wd, DATA, GlowVars, 1, seq->effectdata); break; case SEQ_TYPE_TRANSFORM: writestruct(wd, DATA, TransformVars, 1, seq->effectdata); break; case SEQ_TYPE_GAUSSIAN_BLUR: writestruct(wd, DATA, GaussianBlurVars, 1, seq->effectdata); break; case SEQ_TYPE_CUSTOMEFFECT: writestruct(wd, DATA, CustomEffectVars, 1, seq->effectdata); break; case SEQ_TYPE_TEXT: writestruct(wd, DATA, TextVars, 1, seq->effectdata); break; } } writestruct(wd, DATA, Stereo3dFormat, 1, seq->stereo3d_format); |
Definiciones de nuestro efecto
Ya va quedando menos, tenemos esto casi configurado, sólo quedan algunos callbacks con las llamadas que hacen los propios filtros, vamos, ahora es cuando nuestro filtro hace algo, aunque es necesario definirlo para que el programa no explote:
En el archivo source/blender/blenkernel/intern/seqeffects.c encontramos el código de estos efectos. Lo primero será introducir las definiciones de nuestro efecto en la función get_sequence_effect_impl() en la línea 3315 o así, buscamos los efectos del switch y ponemos el nuestro al final:
1 2 3 4 5 6 7 8 9 10 11 12 13 14 15 16 17 18 19 20 21 22 23 24 25 26 27 28 29 30 | case SEQ_TYPE_ADJUSTMENT: rval.supports_mask = true; rval.num_inputs = num_inputs_adjustment; rval.early_out = early_out_adjustment; rval.execute = do_adjustment; break; case SEQ_TYPE_GAUSSIAN_BLUR: rval.init = init_gaussian_blur_effect; rval.num_inputs = num_inputs_gaussian_blur; rval.free = free_gaussian_blur_effect; rval.copy = copy_gaussian_blur_effect; rval.early_out = early_out_gaussian_blur; rval.execute = do_gaussian_blur_effect; break; case SEQ_TYPE_TEXT: rval.num_inputs = num_inputs_text; rval.init = init_text_effect; rval.free = free_effect_default; rval.copy = copy_effect_default; rval.early_out = early_out_text; rval.execute = do_text_effect; break; case SEQ_TYPE_CUSTOMEFFECT: rval.init = init_custom_effect_effect; rval.num_inputs = num_inputs_custom_effect; rval.free = free_custom_effect_effect; rval.copy = copy_custom_effect_effect; rval.early_out = early_out_custom_effect; rval.execute = do_custom_effect_effect; break; |
Aquí definiremos:
- rval.init : función que inicializa nuestro efecto
- rval.num_inputs : número de strips de entrada que necesita nuestro strip. Los efectos necesitan estas sobre un strip, las transiciones sobre dos, los generadores no necesitan strips.
- rval.free : Qué hacemos cuando se quita nuestro efecto (para liberar memoria)
- rval.copy : Qué hacer cuando copian nuestro efecto.
- rval.early_out : A veces, podemos saber si es necesario o no aplicar el efecto antes de ponernos a procesar. Aquí veremos si procesamos, si devolvemos el valor de la entrada, o no devolvemos nada
- rval.execute : NUESTRO EFECTO !!!
- rval.supports_mask : ¿Soporta máscaras? (es un booleano, no un callback
- rval.load : Qué hacer cuando se acaba de cargar el efecto?
- rval.init_execution : Este callback se ejecutará antes de hacer el render de nuestro efecto.
- rva.multithreaded : El efecto soporta threads. Y en lugar de llamar a rval.execute se llamará a rval.execute_slice, por lo que si hacemos nuestro efecto multihilo tendremos que hacerlo independiente de las líneas de origen y fin que nos pasen (Blender ya se encarga de crear hilos y de todo lo demás, nosotros sólo tenemos que definir lo que hace cada uno).
Encontraremos toda la información en source/blender/blenkernel/BKE_sequencer.h
Como todo lo que hemos puesto son callbacks, tendremos que definirlos, voy a poner todo el código seguido, pero si queréis tenerlo ordenado buscad funciones parecidas de otros efectos y poned el vuestro por ahí:
1 2 3 4 5 6 7 8 9 10 11 12 13 14 15 16 17 18 19 20 21 22 23 24 25 26 27 28 29 30 31 32 33 34 35 36 37 38 39 40 41 42 43 44 45 46 47 48 49 50 51 52 53 54 55 56 57 58 59 60 61 62 63 64 65 66 67 68 69 70 71 72 73 74 75 76 77 78 79 80 81 82 83 84 85 86 87 88 89 90 | /*********************** Custom Effect *************************/ static void init_custom_effect_effect(Sequence *seq) { if (seq->effectdata) MEM_freeN(seq->effectdata); seq->effectdata = MEM_callocN(sizeof(CustomEffectVars), "customeffectvars"); } static int num_inputs_custom_effect(void) { return 1; } static void free_custom_effect_effect(Sequence *seq) { if (seq->effectdata) MEM_freeN(seq->effectdata); seq->effectdata = NULL; } static void copy_custom_effect_effect(Sequence *dst, Sequence *src) { dst->effectdata = MEM_dupallocN(src->effectdata); } static int early_out_custom_effect(Sequence *seq, float UNUSED(facf0), float UNUSED(facf1)) { /* source/blender/blenkernel/BKE_sequencer.h */ /* #define EARLY_NO_INPUT -1 */ /* #define EARLY_DO_EFFECT 0 */ /* #define EARLY_USE_INPUT_1 1 */ /* #define EARLY_USE_INPUT_2 2 */ CustomEffectVars *UNUSED(data) = seq->effectdata; /* I will always do my effect */ /* if (data->property == 0) { */ /* return EARLY_USE_INPUT_1; */ /* } */ return EARLY_DO_EFFECT; } // NUESTRO EFECTO !!!!!!!!!!!!! static ImBuf *do_custom_effect_effect(const SeqRenderData *context, Sequence *seq, float UNUSED(cfra), float UNUSED(facf0), float UNUSED(facf1), ImBuf *ibuf1, ImBuf *ibuf2, ImBuf *ibuf3) { ImBuf *out = prepare_effect_imbufs(context, ibuf1, ibuf2, ibuf3); CustomEffectVars *cv = (CustomEffectVars *)seq->effectdata; unsigned char *rect, *orig; int x= context->rectx; int y= context->recty; float prop = cv->property; if (out->rect) { orig = (unsigned char *)ibuf1->rect; rect = (unsigned char *)out->rect; while (y--) { x = context->rectx; while (x--) { rect[0] = (orig[0]+ prop*orig[1])/(1+prop); rect[1] = (orig[1]+ prop*orig[2])/(1+prop); rect[2] = (orig[2]+ prop*orig[1])/(1+prop); rect[3] = 220; rect += 4; orig += 4; } } } else if (out->rect_float) { orig = (unsigned char *)ibuf1->rect_float; rect = (unsigned char *)out->rect_float; while (y--) { x = context->rectx; while (x--) { rect[0] = (orig[0]+ prop*orig[1])/(1+prop); rect[1] = (orig[1]+ prop*orig[2])/(1+prop); rect[2] = (orig[2]+ prop*orig[1])/(1+prop); rect[3] = 0.5; rect += 4; orig += 4; } } } return out; } |
¡Y listo! Si compilamos Blender ya tenemos nuestro efecto.
En la función do_custom_effect_effect(), tenemos los siguientes parámetros para la entrada:
- const SeqRenderData *context : El contexto, aquí tenemos acceso a muchísimas cosas, demasiado para enumerarlo aquí, pero accedemos a la estructura Main que contiene casi todo, podemos acceder a la escena, elementos guardados y miles de cosas más.
- Sequence *seq : Toda la información del strip actual
- float cfra: Fotograma actual, puede tener un error de +-0.5 frames.
- float facf0: Cuando estamos operando con contenido entrelazado y estamos animando un efecto, qué porcentaje de efecto recae sobre el campo 0?
- float facf1: lo mismo pero para el campo 1.
- ImBuf *ibuf1, ImBuf *ibuf2, ImBuf *ibuf3: Son las imágenes asociadas al efecto, dependiendo del efecto, habrá varias imágenes implicadas en él.
Y… como extra, si no estamos utilizando una variable, pero la queremos dejar ahí, para que el compilador no se queje podemos envolverla con la macro UNUSED()
La comunidad Blender
En https://developer.blender.org/ encontramos un sistema en el que se ponen en común bugs y pequeñas características (si quieres colaborar en algo grande, tienes que contactar con ellos). Y actualmente el secuenciador lo tienen un poco abandonado, de todas formas, hay una parte importante de la comunidad que sigue ahí, enviando parches y mejoras.


Pingback: Experimento: Creando un nuevo effecto de imagen para el secuenciador de vídeo de Blender (VSE) con código fuente | PlanetaLibre /
Pingback: Experimento: Creando un nuevo efecto de imagen para el secuenciador de vídeo de Blender (VSE) con código fuente | PlanetaLibre /
I feel strongly about it and love learning more about the subject. If possible, once you have the expertise, would you mind updating your blog quordle with more information? It is extremely helpful for me.
5 letter words is a tool created to help Wordle players win and overcome challenges.
Awesome blog. I have read and thought about what you said. I have bookmarked it and I am looking forward to reading new articles. Keep up the good work!
cyberpunk 2077 david martinez jacket
Excellent information you have shared, thanks for taking the time to share with us such a great article. I really appreciate your work.
T Birds Jacket
Thanks for sharing with us this important Content. I feel strongly about it and really enjoyed learning more about this topic.
Top Ranked Playoff of NBA Players You Need to See
Such an awesome post. This is so cool. Concrete Driveway Contractors